> ## Documentation Index
> Fetch the complete documentation index at: https://docs.flexype.io/llms.txt
> Use this file to discover all available pages before exploring further.
# Orders
> View, search, filter, edit, and export every order placed through FlexyPe checkout.
The **Orders** section lists every checkout that completed successfully and became an order on your store. Each order carries the full picture — customer, items, discounts, taxes, payment transactions, and the marketing journey that led to the sale.
Orders shows **completed** checkouts only. Sessions where the customer dropped off before paying live in [Abandoned Checkouts](/features/abandoned-checkout) instead.
## The orders list
Open **Orders** from the left navigation.
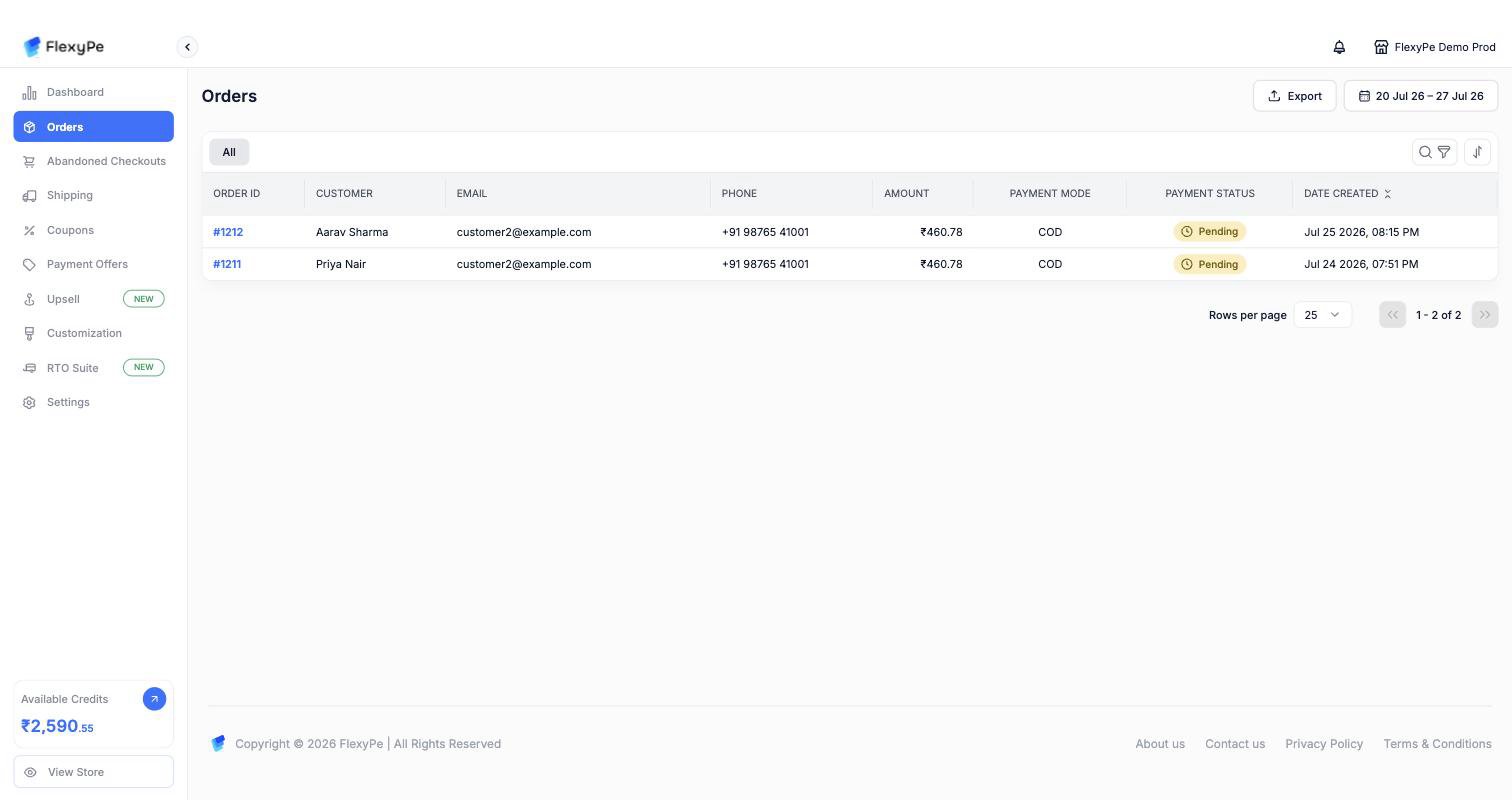 The table shows:
| Column | What it shows |
| ------------------ | ----------------------------------------------------------------------------------------------------------- |
| **Order ID** | Your store's order name (for example `#1042`). Click it to open the order in your store admin in a new tab. |
| **Customer** | Name captured at checkout |
| **Email** | Customer email, with a one-click copy button |
| **Phone** | Dial code and phone number |
| **Amount** | Order total in the order's currency |
| **Payment Mode** | How the customer paid — UPI, Card, COD, and so on |
| **Payment Status** | Current payment state of the order |
| **Date Created** | When the order was placed |
Click any row to open the full order. Use the arrows at the top of an order to step to the previous or next order without going back to the list.
The list loads the **last 7 days** by default. Widen the date range from the date picker to see older orders.
## Searching and filtering
### Search
The search and filter bar is hidden until you ask for it. Click the **search and filter icons** above the table, or press Cmd/Ctrl + F.
The table shows:
| Column | What it shows |
| ------------------ | ----------------------------------------------------------------------------------------------------------- |
| **Order ID** | Your store's order name (for example `#1042`). Click it to open the order in your store admin in a new tab. |
| **Customer** | Name captured at checkout |
| **Email** | Customer email, with a one-click copy button |
| **Phone** | Dial code and phone number |
| **Amount** | Order total in the order's currency |
| **Payment Mode** | How the customer paid — UPI, Card, COD, and so on |
| **Payment Status** | Current payment state of the order |
| **Date Created** | When the order was placed |
Click any row to open the full order. Use the arrows at the top of an order to step to the previous or next order without going back to the list.
The list loads the **last 7 days** by default. Widen the date range from the date picker to see older orders.
## Searching and filtering
### Search
The search and filter bar is hidden until you ask for it. Click the **search and filter icons** above the table, or press Cmd/Ctrl + F.
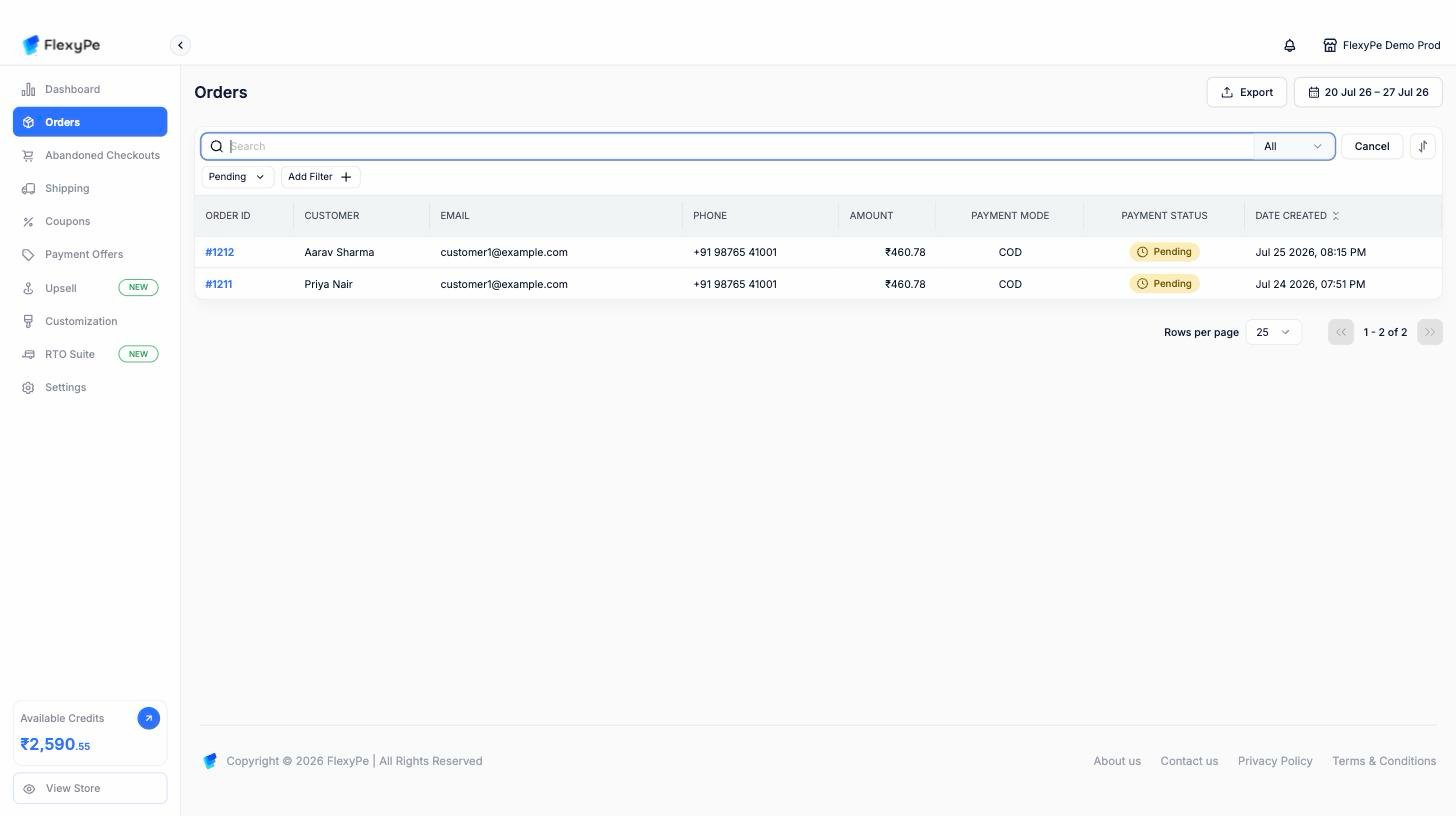 Type your keyword into the search box, then use the selector on its right to choose which field to match against:
| Field | Matches |
| ------------ | -------------------------------------------- |
| **All** | Every field below — the default |
| **Email** | Customer email address |
| **Phone** | Customer phone number |
| **Name** | Customer name |
| **Order ID** | Your store's order name, for example `#1212` |
Press Esc to close the bar and clear what you typed. **Cancel** does the same thing.
### Filters
Click **Add Filter** to pick a filter, then tick the values you want — each filter accepts several at once, and the chip shows what's selected. **Clear** inside a filter's dropdown removes that filter. Add as many as you need; they combine.
* **Pending** — payment not yet confirmed, including COD orders awaiting collection
* **Partially Paid** — part of the total has been received, as with partial COD
* **Paid** — full amount received
* **Refunded** — amount returned to the customer
UPI, EMI, Card, Wallet, Net Banking, Pay Later, Snapmint, Online, and COD.
Razorpay, Easebuzz, PhonePe, Cashfree, CCAvenue, PayU, and Snapmint — so you can isolate orders routed through one gateway.
Set from the date button in the top-right, separately from the filter bar. Pick any start and end date. Your selection persists as you move around the dashboard, so you keep the same window when you return.
### Sorting
Use the **sort icon** at the right of the filter bar. Choose a **Sort By** field — **Created at date** or **Updated at date** — and a **Sort Order**, ascending or descending. Newest first is the default.
Filters, search, and sorting are all reflected in the page URL — copy the address bar to share an exact view with a teammate.
## Order details
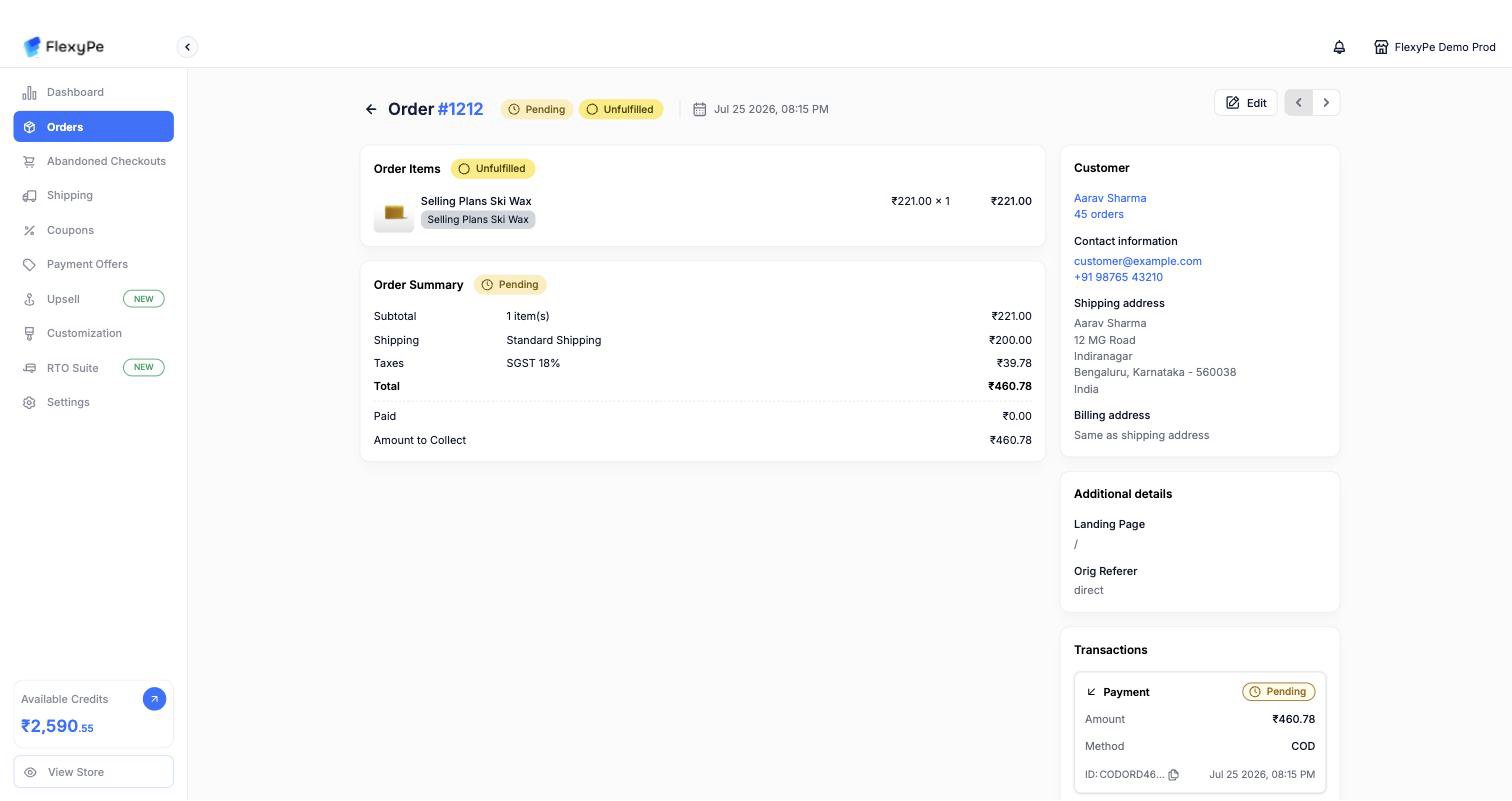
Opening an order shows its payment status, fulfillment status, and creation time in the header, with these panels below.
Type your keyword into the search box, then use the selector on its right to choose which field to match against:
| Field | Matches |
| ------------ | -------------------------------------------- |
| **All** | Every field below — the default |
| **Email** | Customer email address |
| **Phone** | Customer phone number |
| **Name** | Customer name |
| **Order ID** | Your store's order name, for example `#1212` |
Press Esc to close the bar and clear what you typed. **Cancel** does the same thing.
### Filters
Click **Add Filter** to pick a filter, then tick the values you want — each filter accepts several at once, and the chip shows what's selected. **Clear** inside a filter's dropdown removes that filter. Add as many as you need; they combine.
* **Pending** — payment not yet confirmed, including COD orders awaiting collection
* **Partially Paid** — part of the total has been received, as with partial COD
* **Paid** — full amount received
* **Refunded** — amount returned to the customer
UPI, EMI, Card, Wallet, Net Banking, Pay Later, Snapmint, Online, and COD.
Razorpay, Easebuzz, PhonePe, Cashfree, CCAvenue, PayU, and Snapmint — so you can isolate orders routed through one gateway.
Set from the date button in the top-right, separately from the filter bar. Pick any start and end date. Your selection persists as you move around the dashboard, so you keep the same window when you return.
### Sorting
Use the **sort icon** at the right of the filter bar. Choose a **Sort By** field — **Created at date** or **Updated at date** — and a **Sort Order**, ascending or descending. Newest first is the default.
Filters, search, and sorting are all reflected in the page URL — copy the address bar to share an exact view with a teammate.
## Order details
Opening an order shows its payment status, fulfillment status, and creation time in the header, with these panels below.
 ### Items
Every product in the order with variant, image, quantity, unit price, and line total. Line-level discounts show the coupon code and the amount taken off, including bundles, Buy X Get Y groups, add-ons, and upsell items.
Use **Copy checkout url** to grab the checkout link for that session.
### Order summary
The money breakdown for the order:
| Line | Meaning |
| -------------------------- | --------------------------------------------------------- |
| **Subtotal** | Item total before discounts |
| **Discounts** | Total discount applied, with coupon details |
| **Shipping** | Shipping charge, with the rate name and delivery estimate |
| **Tax** | Tax total, broken out by tax line and rate |
| **Total** | Final order value |
| **Paid** | Amount received so far |
| **To be paid by customer** | Outstanding amount, for COD and partial-payment orders |
### Customer
Contact information, shipping address, and billing address, along with how many orders this customer has placed with you. GSTIN and company name appear when the customer supplied them at checkout.
### Transactions
Every payment and refund attempt recorded against the order, showing amount, payment method, gateway, state, and timestamp. This is where to look when a customer says they were charged but the order shows unpaid — a failed or pending transaction will be listed here.
### Conversion details
How the customer reached this purchase:
* **Total sessions** — how many browsing sessions preceded the order
* **Checkout visits** — how many times checkout was opened
* **Days to conversion** — days between first visit and purchase
* **UTM parameters** — source, medium, campaign, term, and content, plus `gclid` and `fbclid` for Google and Meta ad attribution
### Additional details
Payment method, landing page, referring URL, and the customer's device and browser for the session that produced the order.
### Exit checkout reasons
If the customer was shown an exit survey during checkout and answered it, their selected options and any free-text feedback appear here.
## Editing an order
Orders can be edited from the order page — add or remove products, change quantities, apply discounts, and adjust shipping charges. Changes sync back to your store.
Editing is unavailable once an order is **fulfilled**. Make changes before you ship.
### Items
Every product in the order with variant, image, quantity, unit price, and line total. Line-level discounts show the coupon code and the amount taken off, including bundles, Buy X Get Y groups, add-ons, and upsell items.
Use **Copy checkout url** to grab the checkout link for that session.
### Order summary
The money breakdown for the order:
| Line | Meaning |
| -------------------------- | --------------------------------------------------------- |
| **Subtotal** | Item total before discounts |
| **Discounts** | Total discount applied, with coupon details |
| **Shipping** | Shipping charge, with the rate name and delivery estimate |
| **Tax** | Tax total, broken out by tax line and rate |
| **Total** | Final order value |
| **Paid** | Amount received so far |
| **To be paid by customer** | Outstanding amount, for COD and partial-payment orders |
### Customer
Contact information, shipping address, and billing address, along with how many orders this customer has placed with you. GSTIN and company name appear when the customer supplied them at checkout.
### Transactions
Every payment and refund attempt recorded against the order, showing amount, payment method, gateway, state, and timestamp. This is where to look when a customer says they were charged but the order shows unpaid — a failed or pending transaction will be listed here.
### Conversion details
How the customer reached this purchase:
* **Total sessions** — how many browsing sessions preceded the order
* **Checkout visits** — how many times checkout was opened
* **Days to conversion** — days between first visit and purchase
* **UTM parameters** — source, medium, campaign, term, and content, plus `gclid` and `fbclid` for Google and Meta ad attribution
### Additional details
Payment method, landing page, referring URL, and the customer's device and browser for the session that produced the order.
### Exit checkout reasons
If the customer was shown an exit survey during checkout and answered it, their selected options and any free-text feedback appear here.
## Editing an order
Orders can be edited from the order page — add or remove products, change quantities, apply discounts, and adjust shipping charges. Changes sync back to your store.
Editing is unavailable once an order is **fulfilled**. Make changes before you ship.
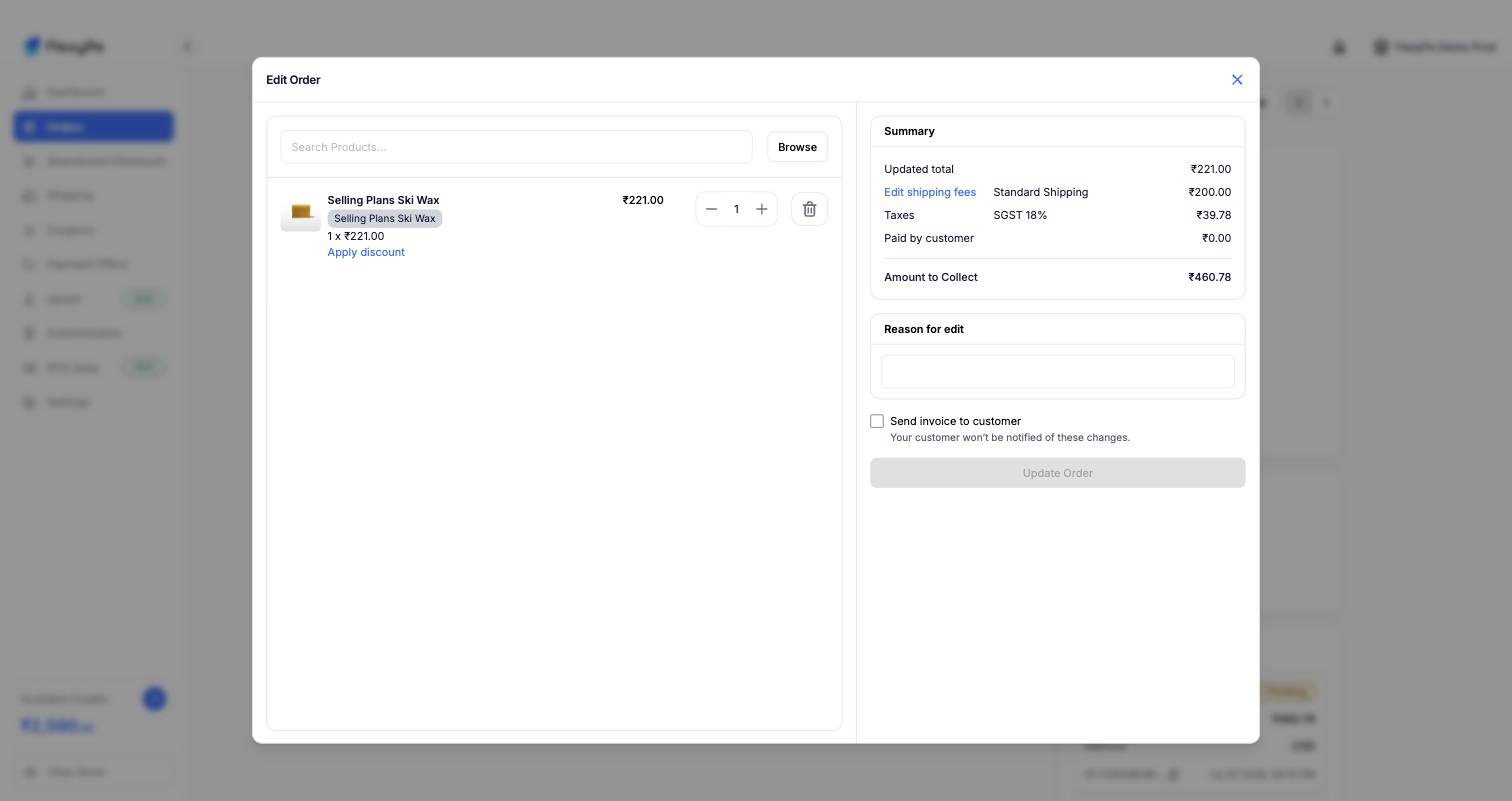 Click **Edit** in the top-right of the order. The current items load into an editable summary.
* **Add products** — use **Search Products** or **Browse** to pick variants to add
* **Change quantity** — use the stepper on any editable line
* **Remove** — delete a line with the bin icon
Items already fulfilled or paid for may be locked. Only editable lines can be changed.
Click **Apply discount** on a line, choose a **Discount Type** — percentage or fixed amount — and enter the **Discount Value**. The reason you give for a discount is visible to the customer.
Use **Edit shipping fees** in the summary to add a shipping charge, or change an existing shipping line's title and amount.
The summary recalculates as you work, showing the **Updated total**, shipping, **Taxes**, **Paid by customer**, and the resulting **Amount to Collect**.
Before you commit:
* Enter a **Reason for edit** so the change is traceable later.
* Tick **Send invoice to customer** if the customer should be told about the change. Leave it unticked and, as the dialog notes, your customer won't be notified.
Click **Update Order** to apply the changes.
## Exporting orders
Export the orders matching your current filters as a CSV, delivered by email.
Apply the date range, search, and filters you want in the export. The export uses exactly what the list is showing.
Click **Export**, confirm or change the destination email address, and click **Send**.
The report arrives within a few minutes.
The CSV includes:
| Group | Columns |
| ------------ | ------------------------------------------------------------------------------- |
| Order | Order Name, Created At, Session State, Total Amount, Currency, Order Admin URL |
| Customer | First Name, Last Name, Email ID, Phone, Shipping Address, Billing Address |
| Payment | Payment Method, Payment State, Payment Provider |
| Products | Items, SKU, Coupons |
| Attribution | utm\_source, utm\_medium, utm\_campaign, utm\_term, utm\_content, gclid, fbclid |
| Transactions | Type, Amount, Provider, Method, State, and Date for the first two transactions |
Narrow the date range before exporting a busy store — smaller reports generate and land faster.
## Frequently asked questions
The payment has not been confirmed yet. For COD orders this is expected until the amount is collected. For online payments, open the **Transactions** panel to see whether an attempt failed or is still processing.
Check the date range first — it defaults to the last 7 days. Also confirm no filter is excluding it, for example a Payment Provider filter set to a different gateway.
The order is already fulfilled. Editing is blocked after fulfillment.
Yes. Edits are applied to the order on your store, so both stay in sync.
The **Exit Checkout Reasons** panel, when the customer answered the exit survey during checkout.
## Need help?
Questions about a specific order or transaction
Sessions that did not convert into orders
Click **Edit** in the top-right of the order. The current items load into an editable summary.
* **Add products** — use **Search Products** or **Browse** to pick variants to add
* **Change quantity** — use the stepper on any editable line
* **Remove** — delete a line with the bin icon
Items already fulfilled or paid for may be locked. Only editable lines can be changed.
Click **Apply discount** on a line, choose a **Discount Type** — percentage or fixed amount — and enter the **Discount Value**. The reason you give for a discount is visible to the customer.
Use **Edit shipping fees** in the summary to add a shipping charge, or change an existing shipping line's title and amount.
The summary recalculates as you work, showing the **Updated total**, shipping, **Taxes**, **Paid by customer**, and the resulting **Amount to Collect**.
Before you commit:
* Enter a **Reason for edit** so the change is traceable later.
* Tick **Send invoice to customer** if the customer should be told about the change. Leave it unticked and, as the dialog notes, your customer won't be notified.
Click **Update Order** to apply the changes.
## Exporting orders
Export the orders matching your current filters as a CSV, delivered by email.
Apply the date range, search, and filters you want in the export. The export uses exactly what the list is showing.
Click **Export**, confirm or change the destination email address, and click **Send**.
The report arrives within a few minutes.
The CSV includes:
| Group | Columns |
| ------------ | ------------------------------------------------------------------------------- |
| Order | Order Name, Created At, Session State, Total Amount, Currency, Order Admin URL |
| Customer | First Name, Last Name, Email ID, Phone, Shipping Address, Billing Address |
| Payment | Payment Method, Payment State, Payment Provider |
| Products | Items, SKU, Coupons |
| Attribution | utm\_source, utm\_medium, utm\_campaign, utm\_term, utm\_content, gclid, fbclid |
| Transactions | Type, Amount, Provider, Method, State, and Date for the first two transactions |
Narrow the date range before exporting a busy store — smaller reports generate and land faster.
## Frequently asked questions
The payment has not been confirmed yet. For COD orders this is expected until the amount is collected. For online payments, open the **Transactions** panel to see whether an attempt failed or is still processing.
Check the date range first — it defaults to the last 7 days. Also confirm no filter is excluding it, for example a Payment Provider filter set to a different gateway.
The order is already fulfilled. Editing is blocked after fulfillment.
Yes. Edits are applied to the order on your store, so both stay in sync.
The **Exit Checkout Reasons** panel, when the customer answered the exit survey during checkout.
## Need help?
Questions about a specific order or transaction
Sessions that did not convert into orders